Creating polished and visually appealing content is essential in today’s digital world. Whether you’re designing newsletters, brochures, or promotional materials, having a reliable toolset is crucial. This guide will walk you through the process of crafting professional documents, providing you with all the necessary tips and techniques.
We will explore the features that allow you to design intricate layouts, seamlessly integrate images and text, and ensure your final product meets high standards. With a focus on practical application, you’ll gain the skills needed to create impressive materials that stand out.
By the end of this guide, you’ll be equipped with the knowledge to confidently produce a variety of documents, tailored to your specific needs. From basic concepts to advanced techniques, every step will be covered in detail, ensuring a smooth and successful experience.
Getting Started with Microsoft Publisher
Starting a new project in this versatile design tool involves familiarizing yourself with the core features and options available for creating visually appealing documents. Whether you’re preparing brochures, newsletters, or any other type of print material, this section will guide you through the initial steps to set up and customize your work environment effectively.
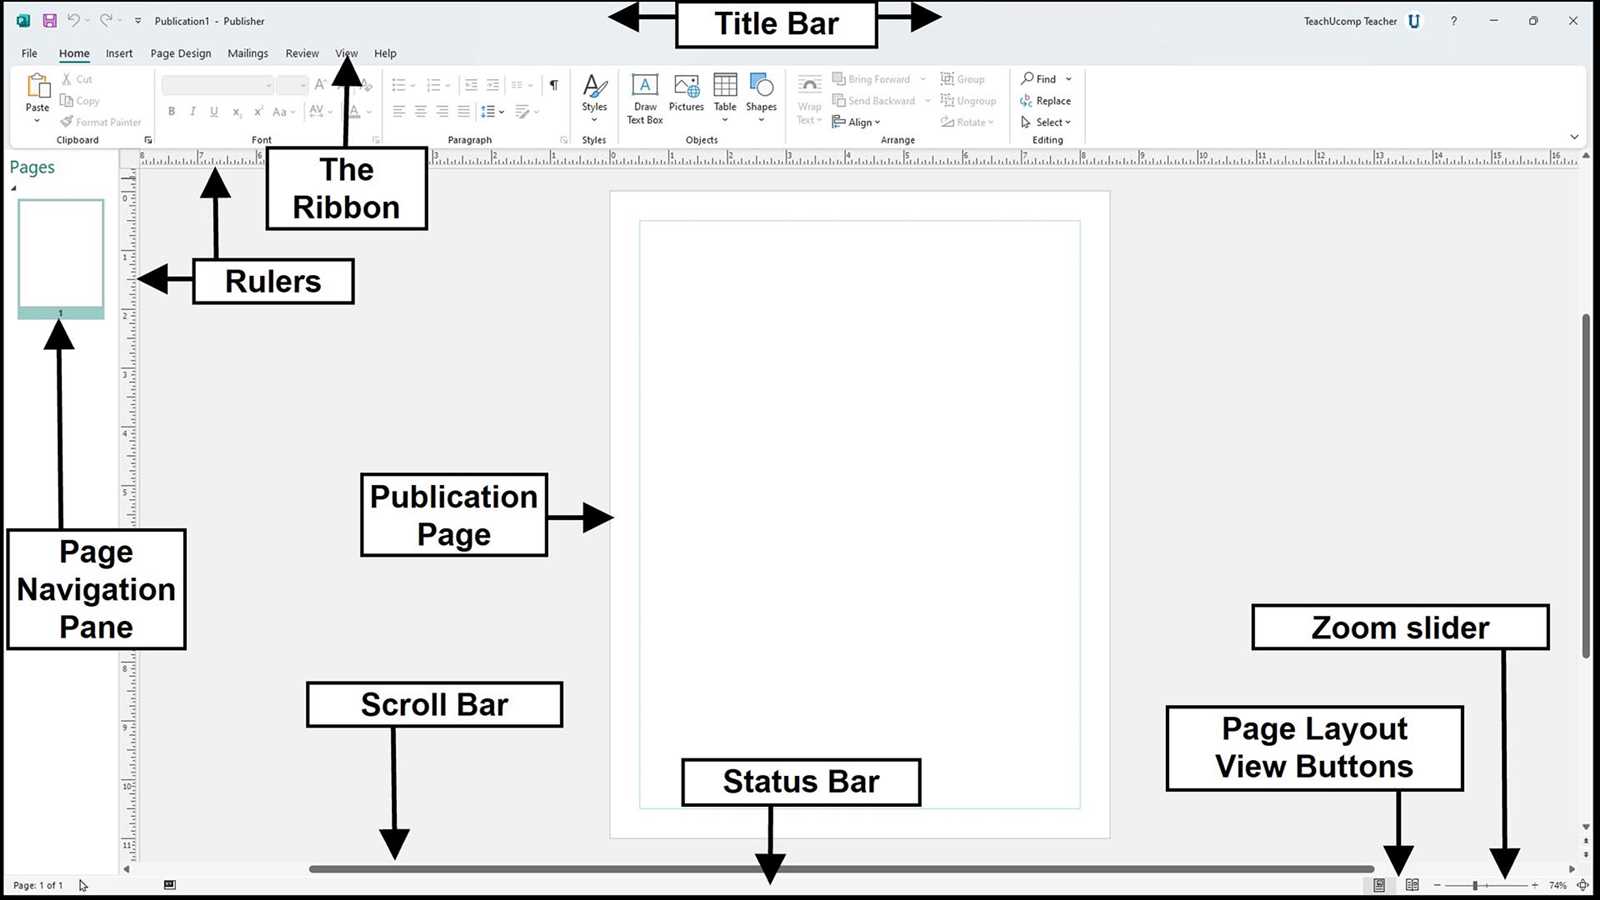
To help you navigate the interface, here is a quick overview of essential functions:
| Function | Description |
|---|---|
| Templates | Choose from a wide variety of pre-designed layouts to kickstart your project, saving time and ensuring consistency. |
| Workspace | Organize your workspace by arranging toolbars and panels according to your preference, allowing for a streamlined workflow. |
| Design Elements | Add and customize text boxes, images, shapes, and other elements to enhance your document’s visual appeal. |
| File Management | Learn how to create, save, and export your projects in various formats for both print and digital distribution. |
By understanding these basics, you’ll be well on your way to creating polished and professional documents with ease.
Creating Your First Publication

Starting your journey into designing and producing print materials can be both exciting and rewarding. Whether you’re crafting a brochure, flyer, or newsletter, this section will guide you through the essential steps needed to create your initial project. By following these straightforward instructions, you’ll be well on your way to producing professional and polished documents.
Here’s a step-by-step guide to help you get started:
- Open the Application: Begin by launching the software designed for creating various print materials. Select ‘New Document’ from the main menu to start a fresh project.
- Choose a Template: Browse through the available templates that suit your publication’s purpose. Templates provide a pre-designed layout, which you can modify according to your needs. Select one that best matches your vision.
- Customize Your Layout: Adjust the layout to fit your content. You can add or remove sections, modify text boxes, and reposition elements as needed. Utilize the drag-and-drop functionality to arrange items with ease.
- Add Content: Insert text, images, and graphics into your design. Ensure that the text is clear and the images are high quality. Use the formatting tools to adjust fonts, colors, and sizes to enhance readability and visual appeal.
- Review and Edit: Carefully review your publication for any errors or inconsistencies. Make necessary adjustments to ensure that everything looks perfect. This is an important step to guarantee a professional finish.
- Save and Print: Once satisfied with your design, save your work. Choose the appropriate file format for printing or digital distribution. If printing, ensure your settings are configured for high-quality output.
With these steps, you’ll have a functional and attractive publication ready to share with your audience. Enjoy the creative process and remember, practice makes perfect!
Designing Pages with Templates
Templates are invaluable tools for creating visually appealing and professionally organized documents with minimal effort. By using pre-designed layouts, you can streamline the design process, ensuring consistency and coherence in your projects. Templates offer a structured foundation, allowing you to focus on content rather than layout intricacies.
Choosing the Right Template
Selecting an appropriate template is crucial for achieving the desired look and feel of your document. Here are some factors to consider:
- Purpose: Identify the primary function of your document, whether it’s a brochure, flyer, or report. Ensure the template aligns with this purpose.
- Audience: Consider the preferences and expectations of your target audience. Choose a design that resonates with them.
- Customization: Evaluate how easily the template can be modified to suit your specific needs. Look for templates that offer flexibility in design elements.
Customizing Your Template
Once you’ve selected a template, personalizing it to match your style and content is essential. Follow these steps to effectively tailor the template:
- Adjust Layout: Modify the layout to fit your content. This might include resizing text boxes, images, or adjusting margins.
- Edit Text: Replace placeholder text with your own content. Ensure the font style and size are consistent with your brand or message.
- Incorporate Graphics: Add relevant images, logos, or icons. Ensure they complement the design and enhance the overall look.
- Color Scheme: Customize colors to match your branding or theme. A cohesive color palette can significantly improve the visual appeal.
- Review and Revise: Thoroughly review your document for any inconsistencies or errors. Make necessary revisions to ensure a polished final product.
Adding and Editing Text Boxes

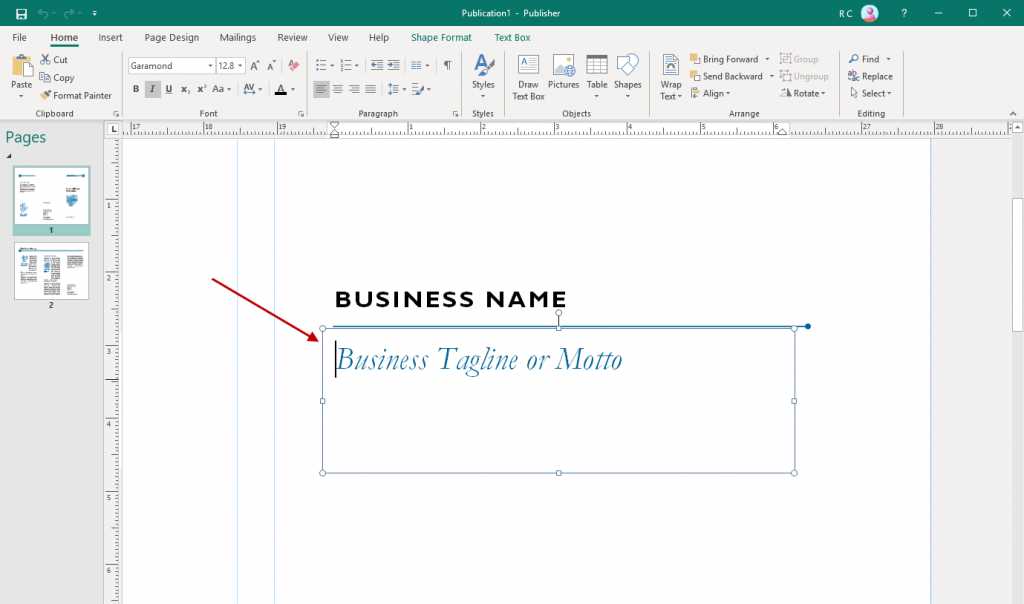
Text boxes are essential components for creating visually appealing documents, allowing you to place and format text within a specific area. By manipulating text boxes, you can enhance the layout and design of your project, ensuring that text is both readable and aesthetically pleasing.
To add a text box, follow these steps:
| Step | Description |
| 1 | Select the tool for inserting text boxes from the toolbar or menu. |
| 2 | Click and drag on the document where you want to place the text box. |
| 3 | Release the mouse button to create the text box, then start typing to input your text. |
To edit a text box, you can:
| Step | Description |
| 1 | Click on the text box to select it. |
| 2 | Adjust the size or position by dragging the edges or corners of the box. |
| 3 | Format the text inside by using the formatting options available, such as font style, size, and color. |
These actions allow you to precisely control how text appears within your document, contributing to a polished and professional result.
Working with Images and Graphics
Integrating visuals into your document enhances its appeal and effectiveness. To create a professional-looking project, it’s essential to master the techniques for managing and manipulating images and graphics. This section will guide you through the process of incorporating, positioning, and editing visual elements to achieve a polished result.
Inserting Images: Begin by adding images from various sources such as your computer, online repositories, or scanned materials. Ensure that your visuals are of high quality and resolution to maintain clarity and impact.
Positioning and Resizing: Adjust the placement and size of images to fit the layout of your document. Utilize alignment tools to position images precisely, and resize them proportionally to avoid distortion.
Editing and Formatting: Once inserted, you can modify images using built-in editing tools. Crop, rotate, and apply filters to enhance their appearance. Additionally, explore options for adding borders, shadows, and other effects to make your visuals stand out.
Working with Graphics: For non-photographic elements like diagrams, charts, and shapes, use the drawing tools provided. Customize these graphics with colors, textures, and styles to match your document’s theme.
By effectively using these techniques, you can significantly improve the visual quality and overall impact of your document, ensuring it is both attractive and functional.
Saving and Exporting Your Project
When working on a creative document, it’s essential to know how to properly save and export your work to ensure that your project is preserved and shared in the desired format. This process involves not only saving your work at various stages but also converting it into different file types for various uses.
Saving Your Work
To maintain your progress, regularly save your project by using the save function, which allows you to store your file on your computer or cloud storage. This step ensures that any changes are recorded and that you can return to your work without losing any updates.
Exporting Your Document
Exporting is the process of converting your file into a different format that is suitable for distribution or printing. Choose the appropriate file type based on your needs, whether it’s a PDF for sharing, an image file for visual presentation, or another format for specific requirements.