In today’s fast-paced world, technology plays a crucial role in managing health and well-being. Understanding how to properly operate health-related devices is essential for maximizing their benefits. This guide provides detailed instructions for utilizing a particular health monitoring tool, ensuring accurate readings and effective usage.
Every feature of this device is designed with the user in mind, focusing on ease of use and precision. Whether you’re setting up the device for the first time or seeking to troubleshoot common issues, this resource covers all the necessary steps to help you achieve the best results.
Mastering the various functions of this equipment is key to maintaining consistent and reliable health data. This guide will walk you through each step, offering clear explanations and tips to make your experience as seamless as possible. With this knowledge, you can confidently manage your health metrics and make informed decisions.
Understanding Your True Metrix Device

In this section, we’ll delve into the essential features and functions of your blood glucose monitoring tool. Whether you are a first-time user or looking to refresh your knowledge, it’s crucial to understand how to effectively operate and interpret the readings from your device. By the end of this guide, you’ll feel confident managing your health data efficiently and with greater ease.
Key Components and Their Functions
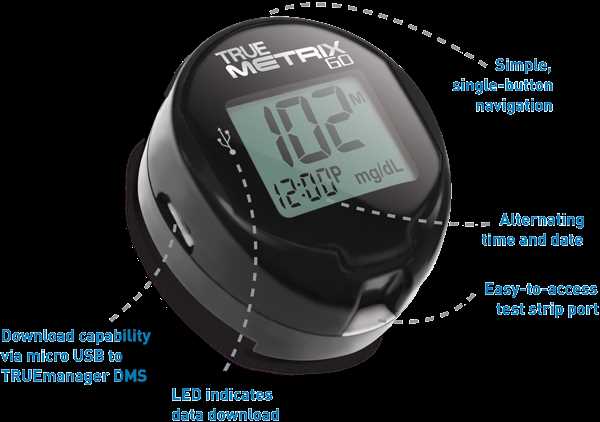
Your monitoring device consists of several vital parts that work together to provide accurate blood glucose readings. The display screen shows your results, while the test strip port is where you insert the test strip to analyze a blood sample. Navigation buttons allow you to access stored data, set up your device, and review previous readings.
Operating Your Glucose Monitoring Tool
To use your device, start by inserting a new test strip into the designated port. Once the device is ready, apply a blood sample to the strip. The screen will display your glucose level within seconds. Ensure you store your readings as needed for future reference. Regularly reviewing your data helps in managing your health and making informed decisions.
How to Set Up Your Device
Setting up your glucose monitor is essential for accurate and reliable readings. This process involves a few simple steps to ensure your device is ready for daily use, helping you keep track of your blood sugar levels effectively.
Step 1: Preparing the Device

Before starting, make sure you have all necessary components, including the monitor, test strips, and batteries. Install the batteries into the device according to the polarity markings. Once the batteries are in place, the screen should light up, indicating that the device is powered on.
Step 2: Configuring the Settings
Upon first use, the monitor will prompt you to set the date and time. These settings are crucial as they allow the device to log each test with the correct timestamp. Follow the on-screen instructions to adjust the settings:
| Setting | Description |
|---|---|
| Date | Adjust the current day, month, and year. |
| Time | Set the hour and minutes, ensuring AM/PM is correct. |
| Units of Measure | Choose the preferred unit for displaying glucose levels (mg/dL or mmol/L). |
Once these settings are configured, your monitor is ready for use. It is now prepared to provide accurate glucose readings, making it a vital tool in managing your health.
Interpreting Blood Glucose Results
Understanding your blood glucose readings is crucial for effective diabetes management. These readings provide essential information about how your body is processing glucose at any given moment, helping you make informed decisions about your diet, exercise, and medication. By regularly monitoring and interpreting your results, you can maintain better control over your health and minimize the risk of complications.
What Your Results Mean

Blood glucose levels fluctuate throughout the day depending on various factors such as food intake, physical activity, and stress levels. Here’s a basic guide to help you interpret these numbers:
- Fasting Levels: The measurement taken after not eating for at least 8 hours. This is often used to determine your baseline glucose level.
- Post-Meal Levels: Typically measured 1 to 2 hours after eating. This helps assess how well your body is managing glucose after a meal.
- Random Levels: Taken at any time, regardless of when you last ate. These can provide insights into your general glucose control throughout the day.
Responding to Your Readings
Your readings may vary, and it’s important to understand how to respond to them:
- Low Glucose Levels (Hypoglycemia): If your reading is below the target range, you may need to consume quick-acting carbohydrates like fruit juice or glucose tablets to raise your levels.
- High Glucose Levels (Hyperglycemia): If your reading is above the target range, consider adjusting your meal plan or increasing physical activity. It may also be necessary to consult with a healthcare professional for further guidance.
- Stable Levels: If your readings are within the desired range, continue following your current management plan, including diet, exercise, and any prescribed medications.
Consistently tracking and reviewing your glucose data can help you identify patterns and make necessary adjustments to your lifestyle and treatment plan.
Maintaining and Cleaning Your Meter
Regular maintenance and thorough cleaning of your meter are essential to ensure accurate readings and prolong the device’s lifespan. A well-maintained meter will provide consistent results and reduce the likelihood of errors, making your daily monitoring more reliable.
- Always handle the device with clean, dry hands to prevent contamination and damage.
- Store the meter in a cool, dry place away from direct sunlight or extreme temperatures to avoid affecting its performance.
- Avoid exposing the meter to moisture or excessive dust, which can interfere with its functionality.
When cleaning your meter, follow these simple steps to keep it in optimal condition:
- Turn off the device before cleaning to avoid any accidental readings or damage.
- Use a soft, lint-free cloth slightly dampened with water or a mild detergent to wipe the exterior. Never immerse the meter in water or any other liquid.
- Ensure that the test strip port is free from dust and debris. A small, dry brush can be used to gently clean around this area.
- Inspect the meter regularly for any signs of wear or damage. If any issues are detected, consult the user support for further guidance.
- Replace the batteries as recommended or when the meter indicates low battery to maintain consistent functionality.
By following these guidelines, you can ensure that your meter remains reliable and accurate, helping you manage your health effectively.
Troubleshooting Common True Metrix Issues
Understanding how to address common challenges that may arise during the operation of your glucose monitoring system is essential. This section provides guidance on resolving frequent problems users encounter, ensuring accurate readings and consistent device performance.
Device Not Powering On
If your device fails to turn on, consider the following steps to identify and resolve the issue:
- Check the Battery: Ensure the battery is properly installed and has sufficient charge. Replace with a new one if necessary.
- Inspect the Battery Contacts: Clean any debris or corrosion from the battery contacts using a dry cloth.
- Press the Power Button Firmly: Ensure the button is being pressed correctly and is not stuck.
Inaccurate Readings
Inconsistent or incorrect results can be caused by several factors. Follow these steps to troubleshoot:
- Verify Test Strips: Check that the test strips are not expired or damaged. Use strips that are stored properly and within their recommended usage period.
- Ensure Proper Sampling: Make sure the blood sample is adequate and the test strip is fully saturated.
- Calibrate the Device: Regularly perform calibration if recommended by the manufacturer to maintain accuracy.
- Temperature and Humidity: Avoid using the device in extreme conditions. Ensure that the environment is within the recommended operating range.
Following these troubleshooting steps should resolve most issues. If problems persist, consult professional support for further assistance.
Optimizing Accuracy with True Metrix
Achieving precise measurements is crucial for effective monitoring and management of health conditions. This section outlines strategies to enhance the precision of your glucose monitoring system, ensuring reliable results every time you test. Implementing these practices will contribute to better overall management of your health and more accurate readings.
Proper Calibration Techniques
Calibration is essential for maintaining accuracy. Regularly calibrating your device according to the manufacturer’s guidelines ensures that it remains in peak condition and provides accurate measurements. Follow the instructions carefully to calibrate your meter, and always use fresh calibration solutions if required.
Consistent Testing Practices
Consistency in your testing procedures significantly impacts the reliability of your results. Always use the same testing site and follow the same steps each time you measure. Additionally, ensure that you are using clean, dry hands and that your testing equipment is properly stored and maintained. Adhering to these practices helps to minimize variability and ensure that your results are both consistent and accurate.