Sewing machines have revolutionized the way we create and mend fabrics, offering a perfect blend of speed, precision, and creativity. Whether you’re a novice exploring the world of stitching or a seasoned enthusiast refining your skills, understanding how to properly set up and maintain your sewing device is crucial for achieving the best results. This guide provides a detailed overview of essential features and functions, ensuring you get the most out of your machine.
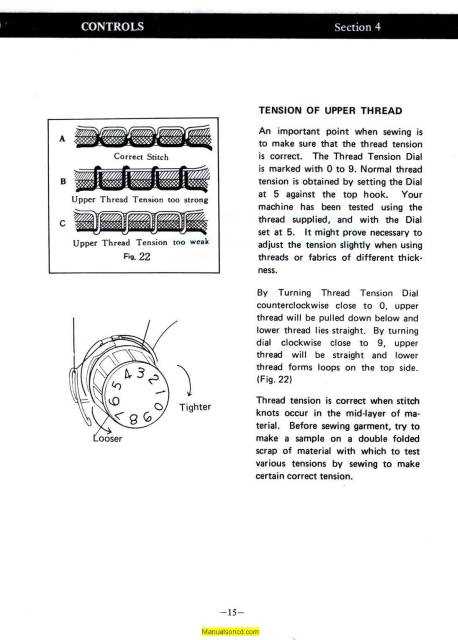
Getting Started: Setting up your sewing machine correctly is the first step to a smooth and enjoyable sewing experience. From threading the needle to adjusting tension, each step plays a vital role in the machine’s performance. We’ll walk you through the fundamental steps to ensure your device is ready for any project you undertake.
Maintenance and Care Tips: Regular upkeep is key to prolonging the life of your sewing equipment and maintaining its efficiency. Learn how to perform routine checks, clean your machine properly, and troubleshoot common issues to keep it running smoothly. By following these tips, you can avoid potential problems and ensure your machine stays in excellent working condition for years to come.

Setting up your sewing machine for the first time can be an exciting experience. In this section, we will guide you through the initial steps needed to prepare your machine for its first use. By following these steps, you’ll ensure a smooth start to your sewing journey and make the most out of your machine’s features.
Before you begin, it’s essential to familiarize yourself with the various components and controls. Understanding these will help you operate the machine efficiently and troubleshoot any issues that may arise during use.
| Step | Description |
|---|---|
| 1. Unpacking | Carefully remove the machine and all accessories from the packaging. Place the machine on a stable surface to prevent any wobbling during use. |
| 2. Power Connection | Connect the power cord to a nearby outlet and ensure the machine is switched off before plugging it in. Attach the foot pedal to the designated port on the side of the machine. |
| 3. Threading the Machine | Follow the threading path indicated on the machine, ensuring that the thread passes through all guides and tension disks. Proper threading is crucial for smooth sewing. |
4. Win
Threading and Bobbin Winding Instructions
Proper threading and bobbin winding are essential steps to ensure smooth and efficient sewing. In this section, we will guide you through the steps required to prepare your sewing machine for stitching, focusing on setting up the thread and bobbin correctly. Following these guidelines will help prevent common issues such as thread jams and uneven stitching. Preparing the Upper ThreadStart by raising the presser foot to ensure the tension discs are open. Place the spool of thread on the spool pin and secure it with a spool cap to prevent it from slipping. Guide the thread through the thread path, following the directional arrows marked on the machine. Pass the thread through the tension discs, making sure it is properly seated. Then, pull the thread through the take-up lever and continue threading through the remaining guides, finishing with threading the needle. Bobbin Winding Process
To wind the bobbin, first ensure the bobbin is empty and clean. Place the spool of thread on the spool pin, and then pull the thread through the bobbin winding guide, ensuring it is securely in place. Insert the bobbin onto the bobbin winder shaft and push it to the right to engage the winding mechanism. Hold the thread end and press the foot pedal to start winding. Continue winding until the bobbin is full, then trim the excess thread and remove the bobbin. Once both the upper thread and the bobbin are correctly set up, insert the bobbin into the bobbin case, making sure it Basic Sewing Techniques for Beginners
Sewing is a valuable skill that allows you to create and repair various items. Whether you are just starting out or looking to refine your abilities, understanding some basic techniques is essential. These fundamental methods will help you build confidence as you navigate different projects, from simple hems to more complex stitches. One of the first steps in sewing is learning how to thread the needle and prepare the machine for stitching. It’s important to ensure the thread is properly wound on the bobbin and correctly placed in the machine to avoid tangles and ensure smooth operation. Taking the time to understand your equipment will make the sewing process more enjoyable and efficient. Once you are familiar with setting up your sewing equipment, practice some basic stitches. Start with a straight stitch, which is the foundation for most sewing projects. Adjust the stitch length depending on the fabric and the purpose of the seam. A shorter stitch length is ideal for delicate fabrics, while a longer stitch length works well for heavier materials. After mastering the straight stitch, try a zigzag stitch. This stitch is versatile and useful for finishing edges and adding elasticity to seams, especially when working with stretch fabrics. Experimenting with different stitch widths and lengths will help you understand how to use this stitch effectively. Another essential technique is backstitching, which reinforces the beginning Maintenance Tips for Long-Lasting Performance
Ensuring that your sewing machine remains in optimal condition involves a few simple yet effective maintenance practices. Regular upkeep can prevent unexpected issues and extend the lifespan of the device, keeping it functioning smoothly and efficiently. First, regularly clean the machine to remove dust and lint. Use a soft brush or vacuum to reach inside and around the mechanisms. Keeping these areas clean helps prevent clogging and ensures that the machine operates without unnecessary strain. Lubrication is another crucial aspect. Apply sewing machine oil as recommended by the manufacturer to keep moving parts well-lubricated. This reduces friction and wear, contributing to more reliable performance over time. Additionally, always use the correct type of thread and needle for your projects. Using inappropriate materials can cause strain on the machine and result in poor stitching or even damage. Refer to the device’s specifications to select the right components for each task. Finally, regularly check for and address any issues or unusual sounds promptly. Early detection of potential problems can prevent them from escalating into more serious repairs. Keeping up with these maintenance practices ensures that the sewing machine remains a dependable tool for your projects. Troubleshooting Common Sewing Machine IssuesWhen working with sewing machines, encountering issues is quite common. Understanding how to identify and resolve these problems efficiently can save time and ensure smooth operation. This section provides insights into some typical issues and practical solutions to address them.
By addressing these common issues promptly, you can maintain optimal performance and extend the lifespan of your sewing machine. Regular maintenance and proper handling are key to avoiding many common problems. Exploring Advanced Features and Functions
Delving into the sophisticated capabilities of a sewing machine reveals a range of innovative functions designed to enhance the crafting experience. These advanced features are crafted to offer greater control, precision, and flexibility, making complex tasks more manageable and efficient. Custom Stitch Patterns and Functions
Modern sewing machines provide the option to access and create custom stitch patterns. This functionality allows users to design unique stitches tailored to specific projects or personal preferences. With the ability to adjust stitch length, width, and density, users can explore endless creative possibilities. Automated Threading and Tension Control
Another notable advancement is the automated threading system, which simplifies the threading process and reduces manual effort. Additionally, machines with advanced tension control ensure consistent stitch quality by automatically adjusting thread tension based on fabric type and stitch settings. |
